Thursday, January 22, 2015

Technics SU-8600 Integrated Amplifier


Technics SU-8600 Integrated Amplifier 
Heres an interesting AU-8600 Integrated Amplifier by Technics which was a Panasonic  house brand. Its a fairly large unit with some impressive features such as a nice enclosed multi-stepped attenuator, robust heavy shielding signal wiring and constant current feed dual FET amplifier gain stage based on a limiter and BJT circuit. 


Power Supply
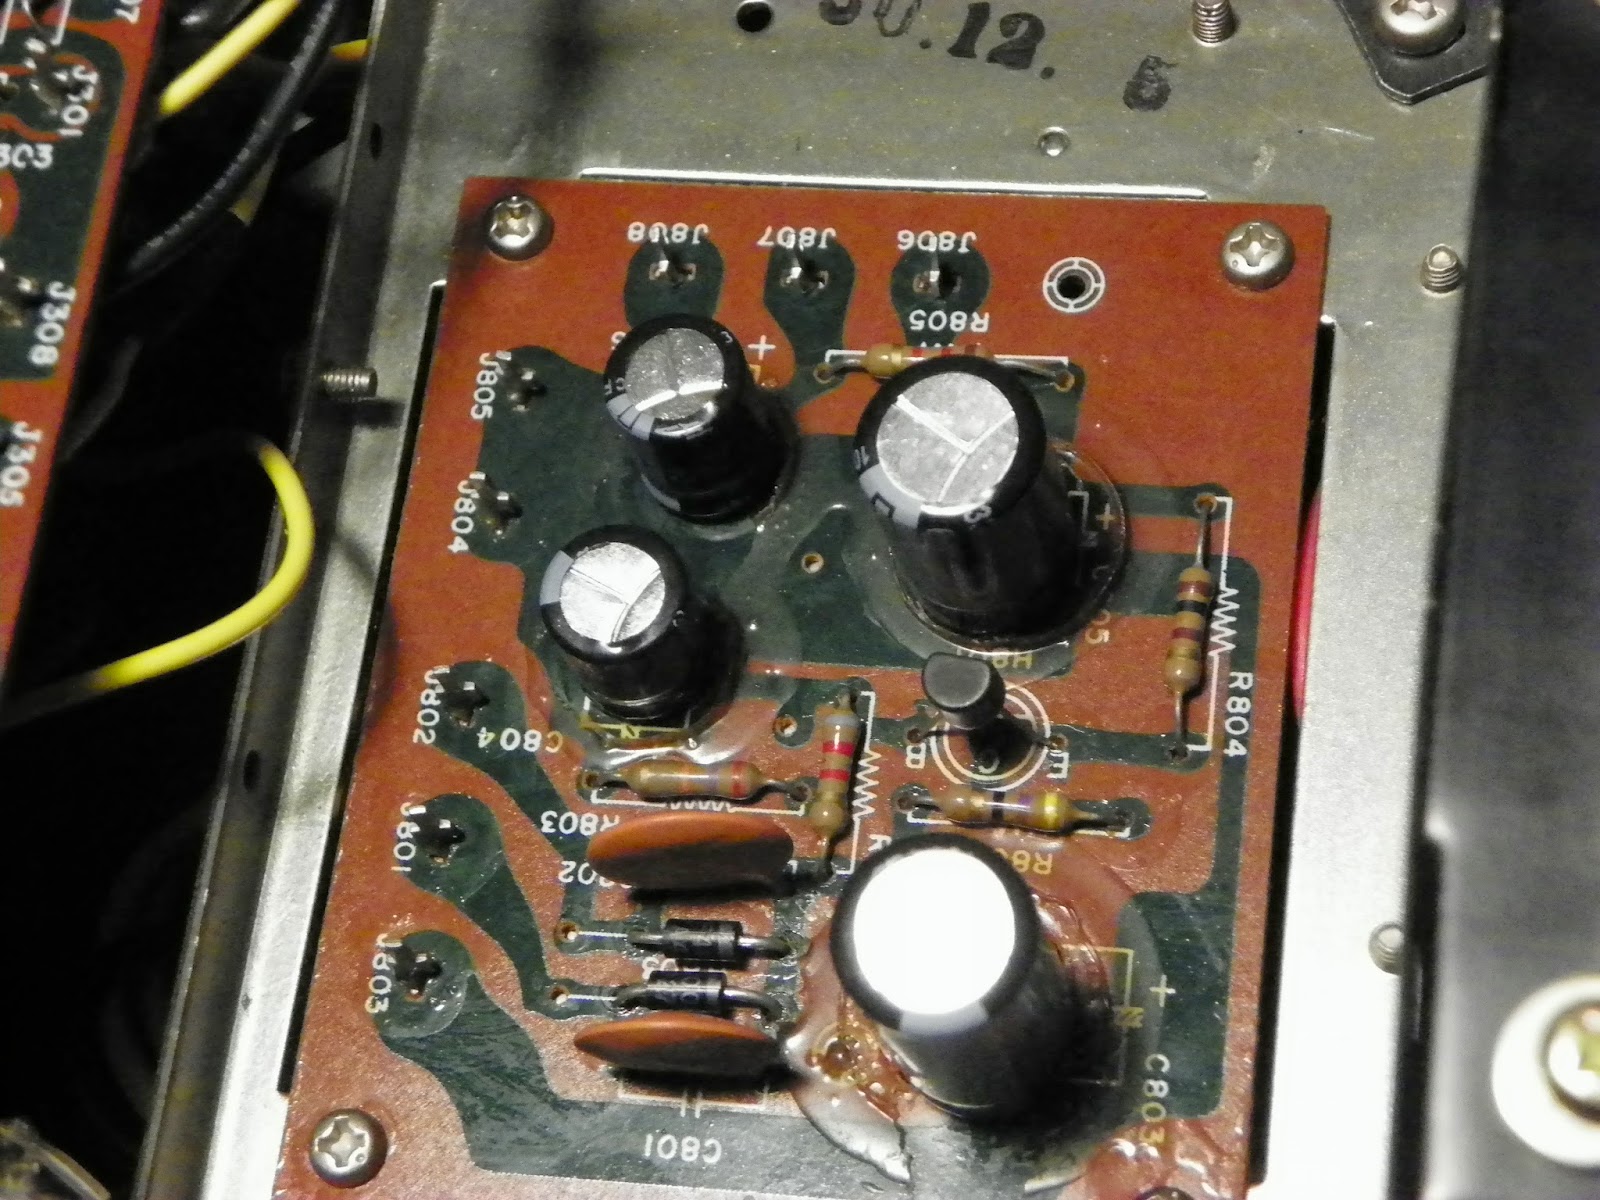
As usual I used some Panasonic FR/FC low impedance high temp capacitors along with Panasonic THA's in the filter, should note a surprise BP is in as well. There are some components to note; TR501/502 the regulator pair and the voltage regulating BJT are a 700BJT case with have poor endurance. These should be replaced with ksa1220/6909 and a ksc 2383. I replaced the general diodes for a more robust 1n4002.  The relay was a standard MY-2 Omron which is a drop in replacement, along without he noted THA filter caps above, no pinout changes to worry about.


Amplifier
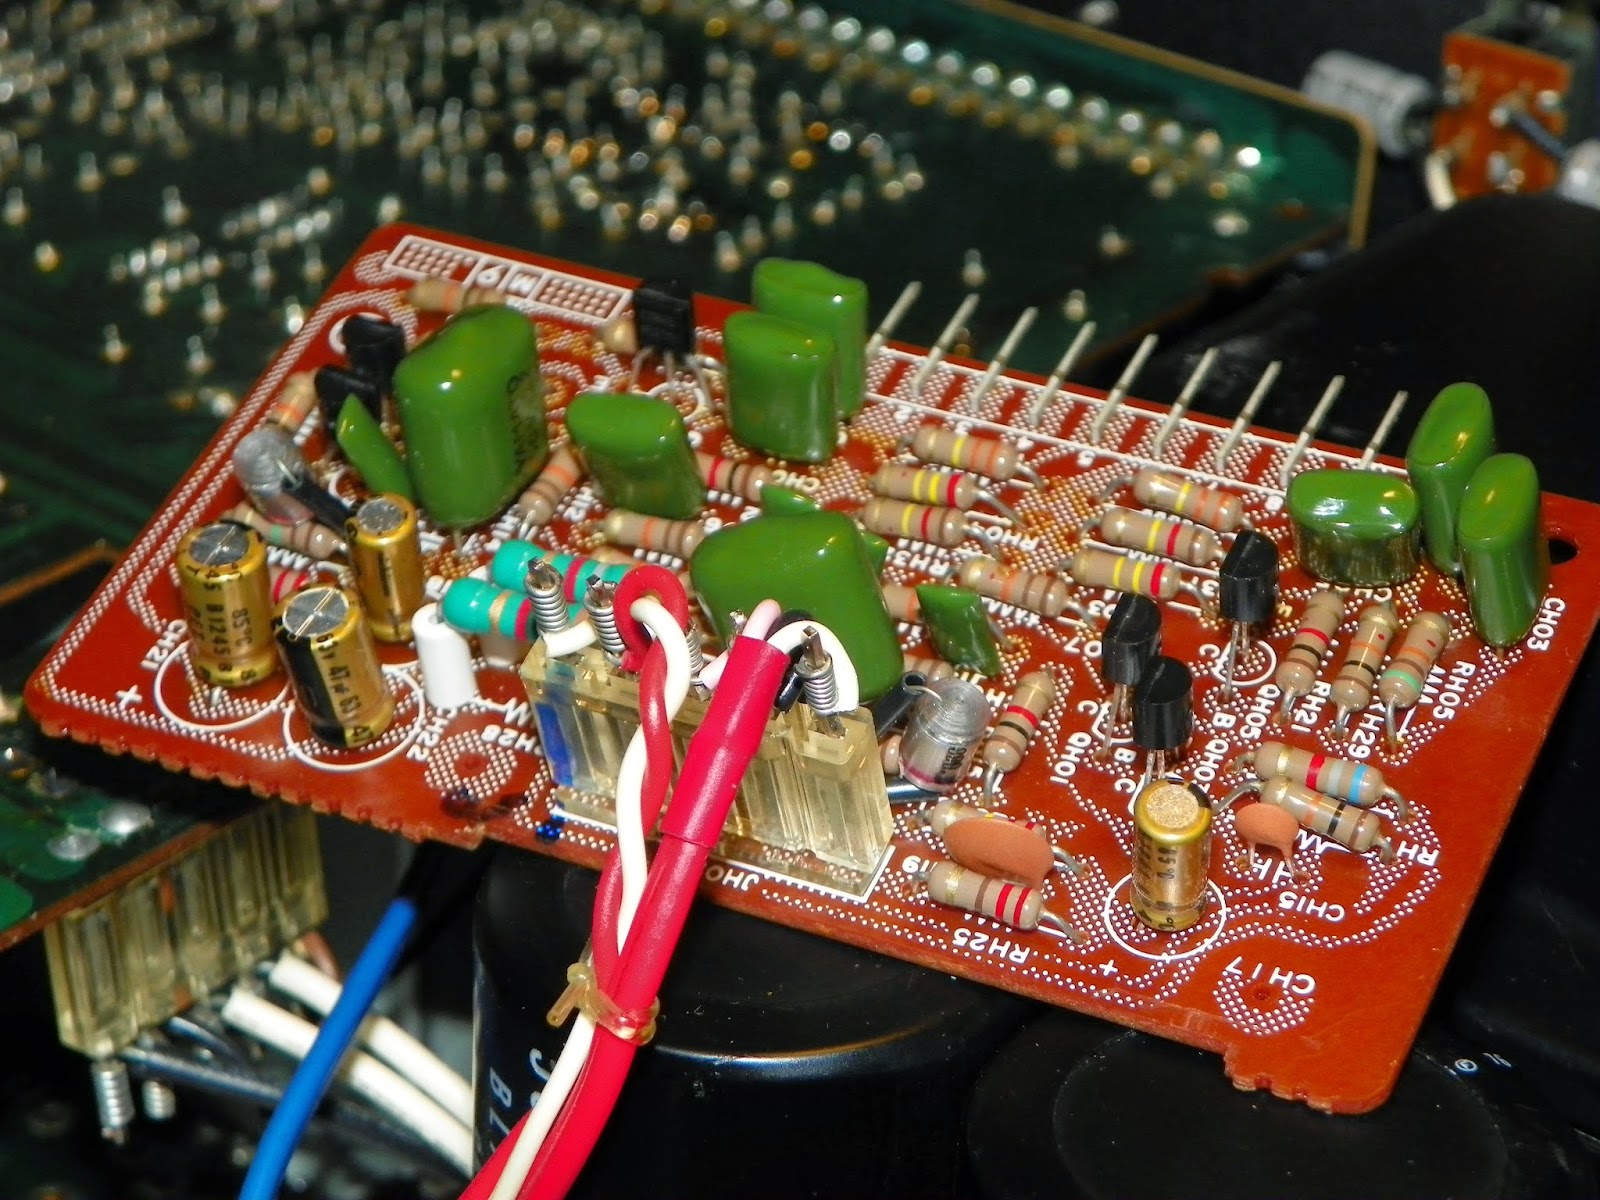
I used some nice Elna Silmic II's and FG's throughout the amplifier stage along with some WIMA MKS2 vie been using exclusively now for all low capacitance locations.  I would like to add we zoo those 700# BJT's here again in the pre-driver pairs. I replaced them again with ksa1220/kscd2690A's respectively. Lots of folks have reported noise from these particular locations. I should add removing the heatsink ank to-3 output bank is easy. Putting the assembly back in is another story….This unit features biasing test pin locations which is always a plus.


Pre/Tone
The input/eq and separate tone control assemblies were recapped using Elna/FG's and more MKS2 films along with a ES BP. Note that one the input/eq PCB has a polar lytic between the pre out and ground tap, also the selector shaft needs to be remove to properly contort the board.  I also ended up removing the entire front chassis assembly to angle the main PCB to an accessible point. 


All in a very robust integrated unit, the silver by the way only came with a outer wood case, no metal enclosures except the pre shielding. The black variant sports a case and rack handles from what I am seeing. 

Sunday, January 11, 2015

Marantz 1152DC Integrated Amplifier Repair

Marantz 1152DC Integrated Amplifier


This unit came in going into protection, also noted was a lack of tone controls and filter modes. Some bench upgrades were done while the unit was opened up including recapping the power supply and amplifier. 


Power Supply
The lyrics here were replaced with Panasonic FC/R and Nichicons, their are also two 133B diodes which are anode cathode series diode in a 3 leg package. I've used UF4005s many time soldering in series and bending to a W, their also a nice MUR1620 TO-220 package replacement available.  Also found was a shorted a Zener in the power supply which was replaced. Its interesting to see there is no regulator adjustment in this circuit.  It also interesting to note all four filter caps are actually wired in parallel, plus the AC/DC mode with the added lyrics across the switch.


Relay
The relay was noted to have a shorted 133B diode and replaced as above along with the QN03-05 BJT(Bi-Polar Transistors), the relay which is a 4dpdt Omron was removed and the contact cleaned. The stand off resistors (1/2W) radiate a lot of heat on the PN00 PCB so I expect many units to so at least minimal charring around RN01/RN09/10.

***Its important to add that RN08 has an incorrect voltage across to Base to Emitter voltages. QN05 B should indicate 1.5VDC wheres as QN04 Emitter voltages should indicate 3.4VDC (5%)+/-


Amplifier 
The entire right channels TO-3 output BJT's were shorted along with several 5.6K resistors shorted and Q721 shorted. 

All the lyrics were replaced with Elna Silmic II and Nichicon capacitors, all the 5.6K and 33 ohm resistors were replaced with a more robust Vishay/BC metal film 1W resistors,  Q721 was replaced and new thermal compound was applied to all 8 heatsink mounted BJT's. Along with both banks of MJ21193/94 ONSEMI outputs with new mica insulators and thermal compound. The only adjustment to note is DC offset, the Bias is pre-determined in the circuit.


***Its important to add that the QT01 BJT Base voltage is NOT tied to the +48 rail supply as indicated.


Filter Amp Assembly
All the lyrics were replaced with Nichicons and all BJT's updated, the location of this board fits into a pin slot not he front panel PCB, to clean the pin connection a pick tool and contact clean is accessible with the faceplate removed.


The 1152DC is very moderately rated, with a single channel at a 4ohm load we noted 144W/CH right before clipping began to plateau, its nominal factory rating is 96W/CH @ 4ohm.

All in im not a fan of the pin connections, some I even remove and solder directly to the PCB pads but for a power amp vs an integrated I would highly recommend!

Saturday, December 20, 2014

Marantz 2252B Receiver

Marantz 2252B Receiver


It would seemed that I've been getting a lot of 50 class 22XX receivers lately. The difference between the 2250B/52 and B variants is all substantial in PCB design and layout. 


Power Supply
This is an interesting design. The power supply and power amplifier board and relay are all located on a single PCB section. Typically I do not like this. IIt creates a significant chance of noise and extra heat dissipation issues. 

On the power supply I used Panasonic FC and FRs, a long life high temp capacitor. Two diodes, a common cathode and common anode should be replace here with a more reliable modern MUR1620CTG/CTRG diodes in the same package (TO-220)
 The relay is another 4 contact Omron MY-4-02 type. What makes this one easier than say the 2330 MY4 is at almost an exact drop in replacement pin wise. 


Power Amplifier 
All the caps were replaced with Elna Silmic II's and Nichicon FG capacitors. One thing to mind is C701, the polarity is backwards on the decoupling cap in this stage.
Access is hard here. Your best bet is to remove the filter capacitors mounted under the chassis (same with the 1070 integrated) and remove the speaker switch arms. I think this was a design issue of fabrication VS repair. The large filter caps were replaced with two 6800uf 80V Nichicon KG type, again these are mounted under the amp boards. New mica insulators and thermal compound was applied as well.


Tone/Pre
This is a fairly easy access board by pulling the pots away from the chassis and pulling out. I used Nichicon MUSE BP capacitors at CE23/24 as theirs no significant DC here, ECW PP's would be nice here too. The two small brown films which I don't like (big browns are stay) were replaced with two .22uf ECW PP Panasonic films. The rest were replaced with WIMA MKS2 and Elna Silmic II capacitors.


Phono/Control.
This is another interesting layout. The phono is combined with the tone control and meter switching. The switching function is pulled through a elongated shaft from the faceplate. The meter capacitor and switching is here also.  WIMA MKS2 (small stage) and Elna Silmic II and Nichicon FG capacitors were used here.


Added a new EG1018-ND power switch and safety capacitor,note the extension shaft. And thats a wrap.


One thing to note on the 2252B is a signal meter issue. After talking with several folks it would appear this is consistent as well where the signal meter dances in all functions. I think this is due to the capacitor way back the line VS across the actual meter, at some point I would advise to place a jumper at C422 and pull the cap across the meter, this may cure that.

Overall its a very nice sounding unit once recapped, very robust and very attractive faceplate, getting away from the black and black bevel and going to the silver dial plate.

Tuesday, December 9, 2014


Another 1060 arrived last week, thought I'd show some variations on the 1060 I did before. Last month I posted a more in depth walk through of the 1060 Integrated restoration, if you need additional information or schematics; go to that post.


Fairly similar to the other, Power Supply was replaced with Panasonic FR capacitors and two UF4005 diodes replaced. 


On the Amplifier board I went with Silmic II's, FG's and WIMA's. This time I also dropped in a GEN II matched up .1uf's PP capacitors replacing the original thin brown films at 725/726. I used the Gen II in the same stage in the Marantz 2325 I restored.  I was pretty impressed with the results, as I am again this time. The Main caps were replaced with a Nichicon KG 10000uf and the couplings with THA 6800ufs.


The Pre-Amp board is pretty much the same, I used WIMA's and Silmic II's along with MUSE for the bipolar replacements.  The green films at 401/402 were replaced with matched .22uf Mudorf EVO PP's. The same as the 2230 pre amplifier, IMHO these are excellent for smoothing out details that are too sharp, in fact if your gonna be using the Sonicaps at all, I would recommend these, as the sonicaps by themselves can be a lil bright. 


The Phono's tantalums were replaced WIMA and FG and Silmic II's used throughout. H905/906 were replaced with matched KSC1845 BJT's.


I should add that this particular 1060 is just pristine! I love working on these conditions, the chassis still has a sparkle to it. I also wanted too add a note on the faceplate. The owner decided to go with one of Tony's (TMZ) black faceplate. The finish, and constructed is exactly what I anticipated from his other plates…TOTL :)

Monday, December 8, 2014

Marantz 2220 Receiver (NonB)

Marantz 2220
Just got this 2220 in here a few days ago for a basic restore for a fellow. Just covering the phono/PS tone and amplifier boards and main caps, switch etc… Right next to the 2220B and 1060, the 2220 has got to be one of the easiest units to work on, the chassis is very open and accessible. The 2220 is an interesting unit, a pretty common PS noted on several of the lower watt 22XX units with no regulator adjustment. Also these models don't have the bi-pin functions. About the only qualm I have with this unit is its not properly shielding inside, otherwise their really great sounding lower watt receivers, with really clean simple plates.


Power Supply
All the caps were replaced with low ESR/high tempt Panasonic FR's which seem to be perfect for the PS. Three S1B-01-02 diodes at H804/805/808 were replaced with a single UF4005 diode. I've still got to scrape off some excess dried glue from the original caps along with some oozed flux on some PCB's, back then everything was so bulky, I thought about a larger diameter cap but I wasn't happy with specs VS size aesthetics in this case.


Tone
The tone board topography is very similar to the 2230 I noticed, I decided to keep the films present, the fat browns are hard to beat. Elna Silmic II's were used throughout and WIMA MKS2 were placed in the bi-polar section 701/702. This boards has a bunch 458's that the ksc1845's are a go to for. If one removes the tone control PCB the tone board pulls out completely almost and can be contorted easily for more access. 


Phono
The axial here was replaced with the Nichicon TVX I like to use along with Elna Silmic II's and a KG. No diodes to update on this board but H905/906 845's were replaced with matched KSC1845's. The films again were the fat browns. I suppose if I were to replace them the only vie found to come close is the ECW PP panasonic films. Ive used them to replace the yuck original gray films. 


Amplifier
I've never really been a fan of the symmetrical single PCB design when it comes to the amplifier board but alas. Access is fairly easy to pull the board from the unit with a few common grounds to mind. The other trick to this unit was the transistors. This model did not use transistor sockets for the TO-3 type, they used insulated hardware and soldered the leads…Talk about a PITA, if I come across a 2220 again it will most definitely be ordering sockets for it, if they can fit. 
The bypass or 701/702 were replaced with small MKS2 .47ufs and Elna Silmic II's used throughout the amplifier board. New Mica and compound and well.


One thing I did like is the filter/coupling selection, I hate the amp boards smack next to these caps because of the radiant heat put off by the boards. So I kept my normal selection of a Panasonic THA (I think IMHO this is the best cap for this location, sonically better than the KG Ive tried) at the filter and Nichicon KG's but went with 35mm/35mm caps to create a low profile to try and open up some air volume between the caps and board. Im incredibly happy with how this turned out with the symmetric PCB layout 


I did find a 10amp heavy duty automotive power switch inside originally that was replaced with a EG1018-ND dpdt switch and a new TDK X1Y2 safety cap. Threw in some new vellum and LED few lamps for the dial and meter. I did have to reflow the Stereo indicator, Ive had to do this is about a half dozen 22XX's now, either when folks either replace them or heat related solder wear im not sure.